melsc
Premium Member
- Joined
- Aug 17, 2004
- Messages
- 6,365
- Gender
- Female
- HSC
- 2005
This thread explains step by step how to re-size images, make blends and put pictures in your signature. I used photoshop 7 and paintshop pro 8...I know most peopl don't have these programs BUT most graphics applications work in the same way, I will try in the holidays to find and learn how to use a free program if I get the chance.If you have any further questions, post them here or PM me  I hope these instuctions help you
Resizing Images
Making a 'blend'
Putting a picture in your signature
Resizing Images
This is how you re-size images, I used Photoshop 7 but you can use any graphics program.
So you have an image or blend and you want to resize it, this is how you do it.
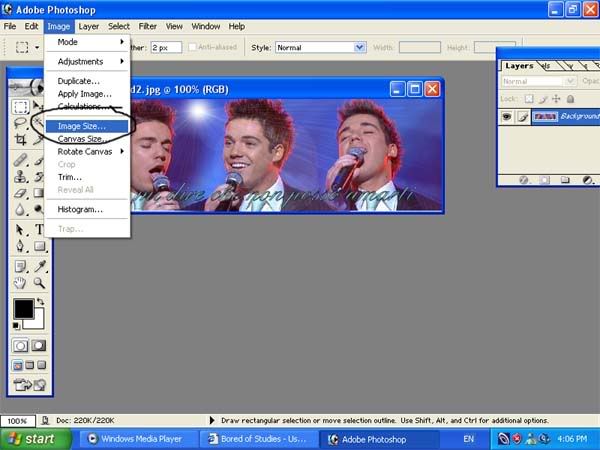
Open your image then go to "Image" followed by "Image Size"
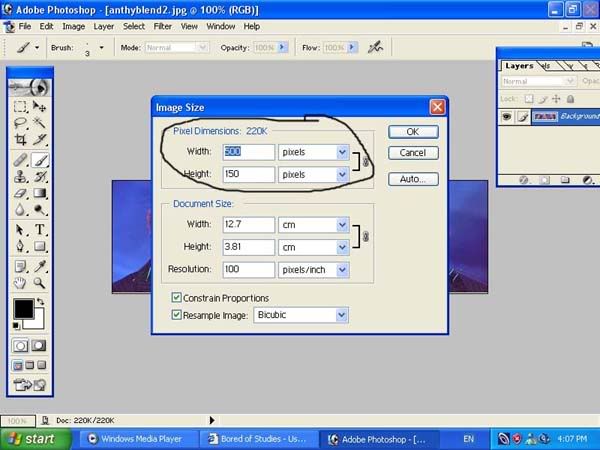
This should then pop up - you can make the dimensions you want, but the standard size for a blend like mine is usually 150*500 pixels.
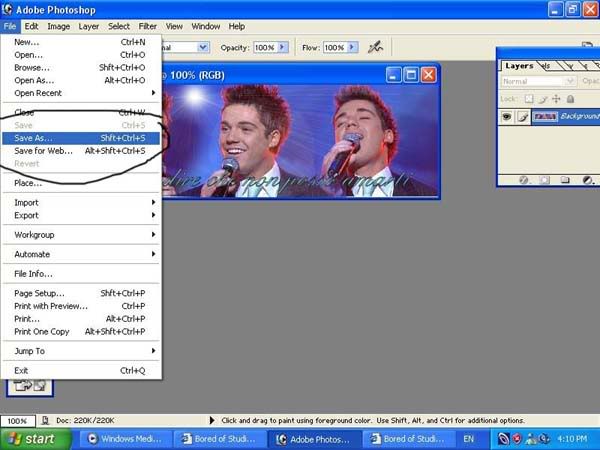
Now you need to save the picture in a valid format, the most common format used on the net is JPEG. If you don't do this it will as a default save it as a PSD which is not always accepted by some hosting sites.
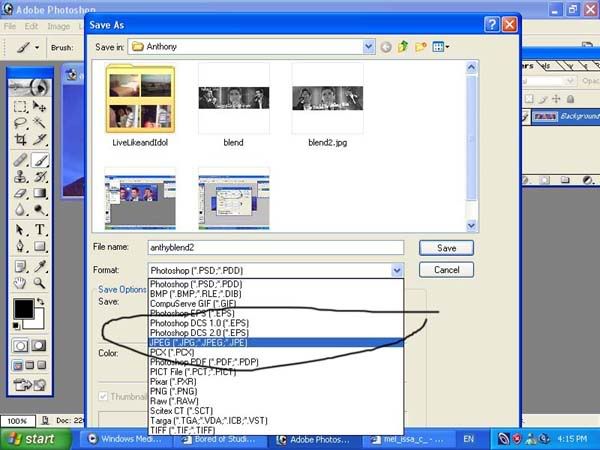
Be careful when saving to make sure that you save it as JPEG (or another format that is accepted by your hosting site) not PSD.
Making a "blend"
What is a blend you ask? This here is my poor excuse for a blend, I am going to
teach you how to make one.

I have used Paintshop Pro 8 but you can do this in most graphics programs.
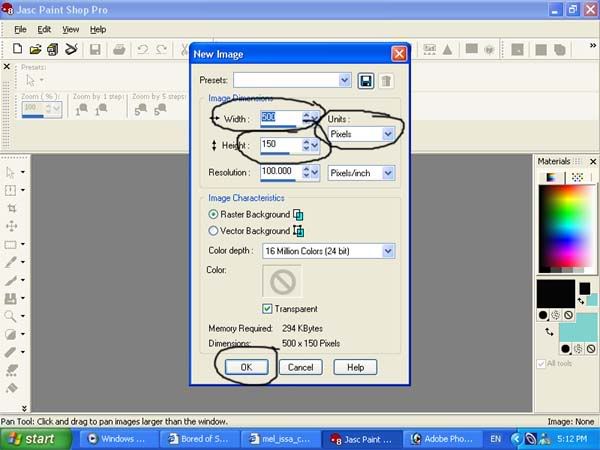
First you need to go to file, new to start a new document. To make a blend the size of mine you need to change the size. Change the width to 500 pixels and the height to 150 pixels (check the setting next to it is on pixels) then click ok.
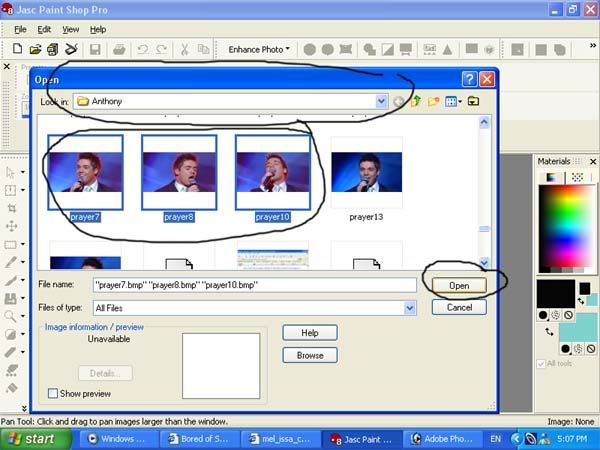
Now you need to open the pictures you intend to blend. You may have to change the folder, to open more than one image at a time - hold down ctrl as you click them. Then click open.
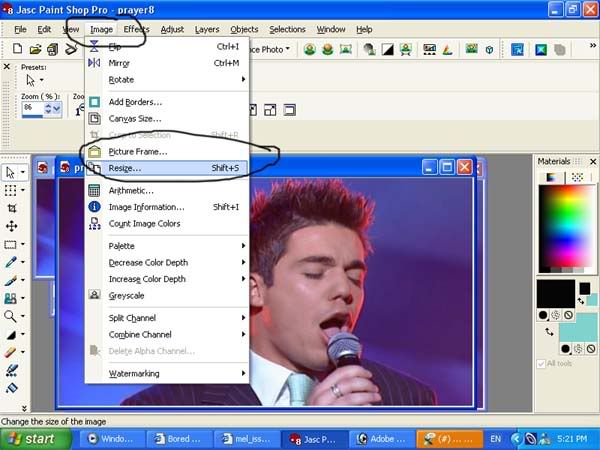
Once you have done this you will need to re-size you images so they fit in the blend, resize each one to the same height as your blend e.g. 150 pixels, the width will automatically resize as you do this YOU DO NOT NEED TO SAVE THE IMAGES. Go to image, resize.
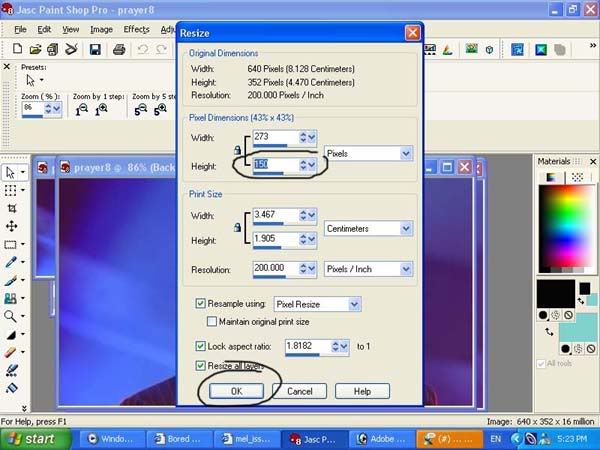
Then change the dimensions to match your blend (e.g height 150 pixels) then click ok.
Repeat this for each picture. You need to click on the pciture to ensure the program knows which picture you are re-sizing.
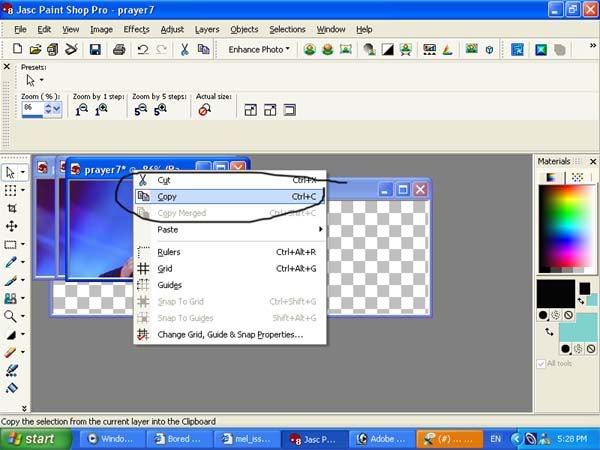
Now you need to copy the picture. Right click the picture you are copying, then click copy.
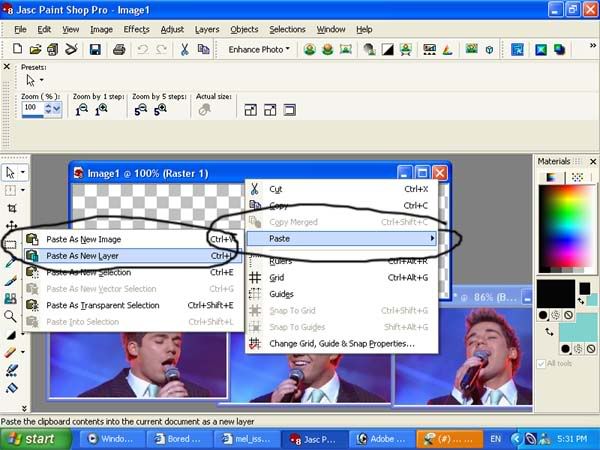
Now right click on the new image you created at the beginning and click paste as a new layer.
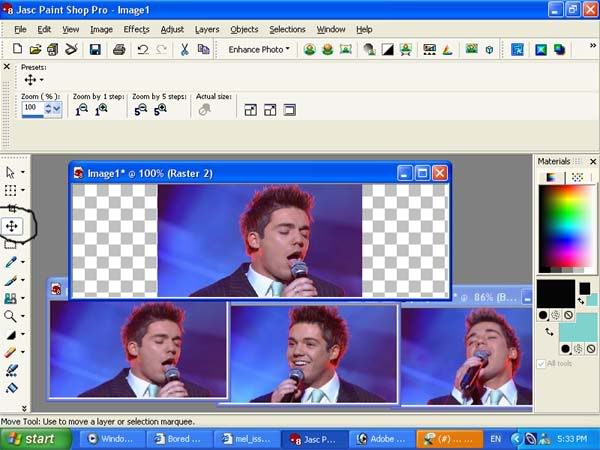
Now you need to position the image, click the "move tool" and move the image to where ever you want it.
Copy, paste and move the other images in the same way. IT IS OK IF THEY OVERLAP AND COVER THINGS, THIS IS PART OF BLENDING.
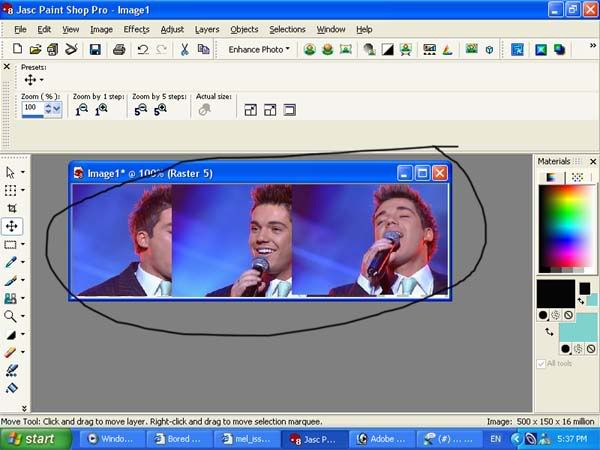
So far it should look like this. Notice the overlaps, we will get rid of them in a sec.
Make sure your layers palette is showing, if it isn't right click the toolbar, click palettes, then click layers (you will need this later).
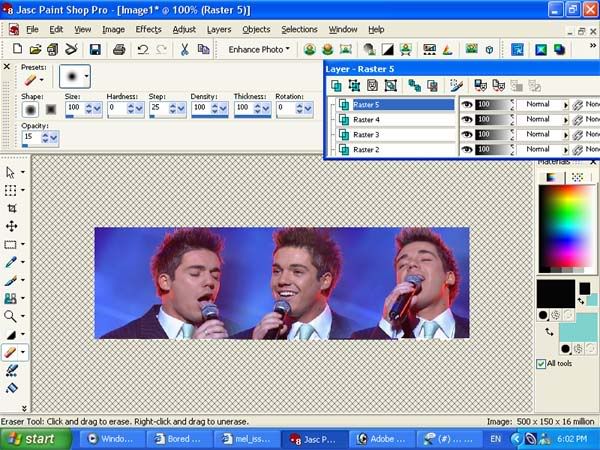
Next you need to click on the eraser tool.
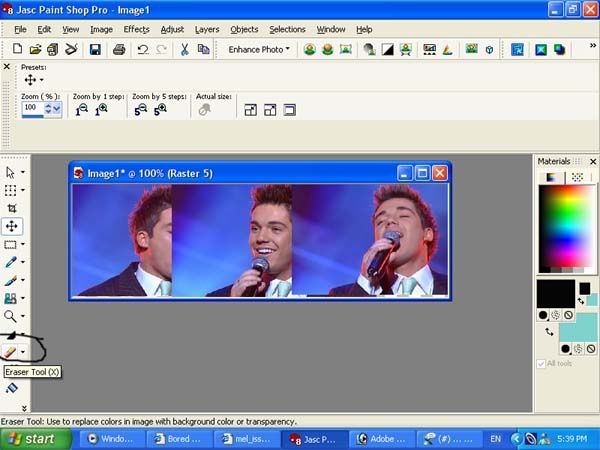
Make sure that your eraser settings are the same as mine, as you get used to blending you can change them to what suits you.
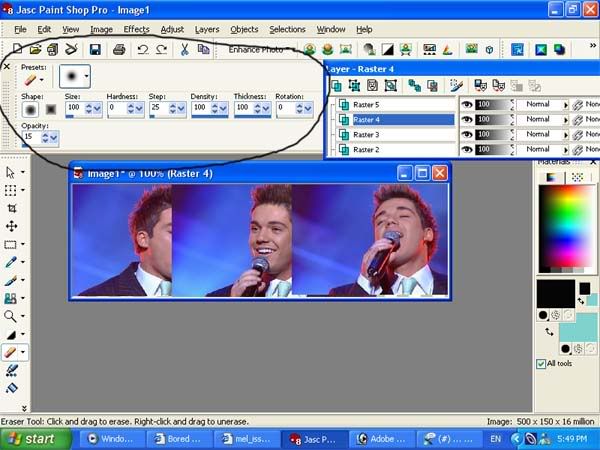
Now move the eraser over the the overlapping area between the 1st and middle picture. Notice how the overlap is starting to fade away, continue to do this until the overlap has dissapeared. Also notice the layers palette, if nothing happens when you click the eraser tool or after one click the picture becomes see-through, click a different layer in the layers palette.
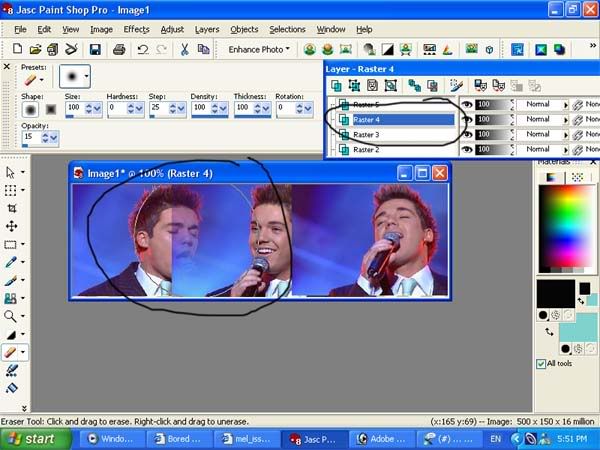
Repeat this for the area between the middle and 3rd picture (you will need to click a different layer, in my case it was layer/raster 5)
Now go to layers, merge and merge visable.
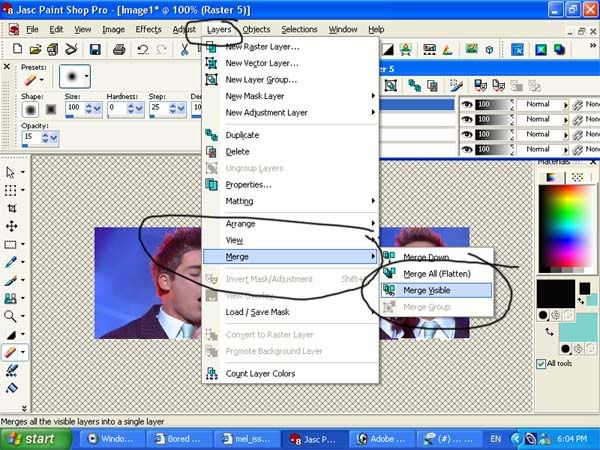
The end product should look like this.
Once you have done all of this, you can add text or effects. Then ensure you save it as a valid format and upload it to hosting site. Instructions for uploading to a hosting site, how to save and put the image in you signature can be found below.
Putting a picture in your signature
Before you do this you should make sure that your image is the right size and has been saved in a valid format.
You need to save the picture in a valid format, the most common format used on the net is JPEG. If you don't do this it will as a default save it as a PSD which is not always accepted.

Be careful when saving to make sure that you save it as JPEG (or another format that is accepted by your hosting site) not PSD.

Now you need to go to a hosting site such as
www.photobucket.com. Once you have registered you can upload images.
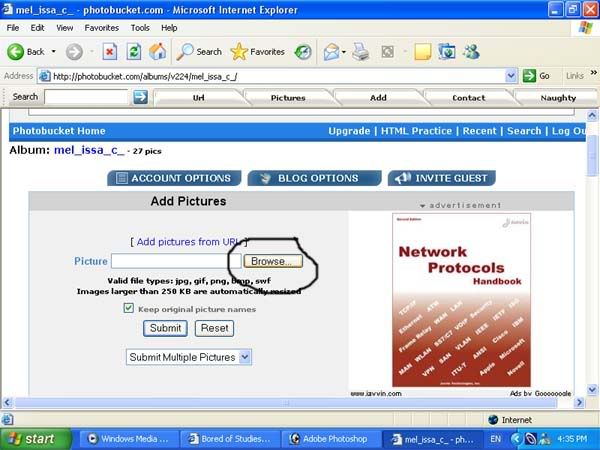
Firstly you have to log in, once you are done you go to "my album". Now you are ready to start uploading. Click browse to find the picture you want to upload.
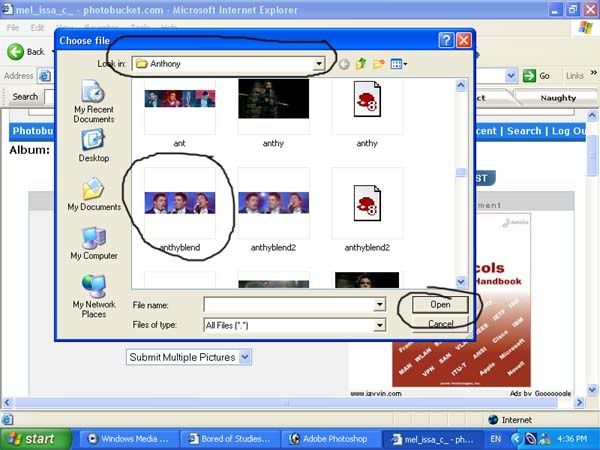
Now find the file you want to upload, you may have to change the folder you are looking in. Then conce you find the picture click on it and click open.
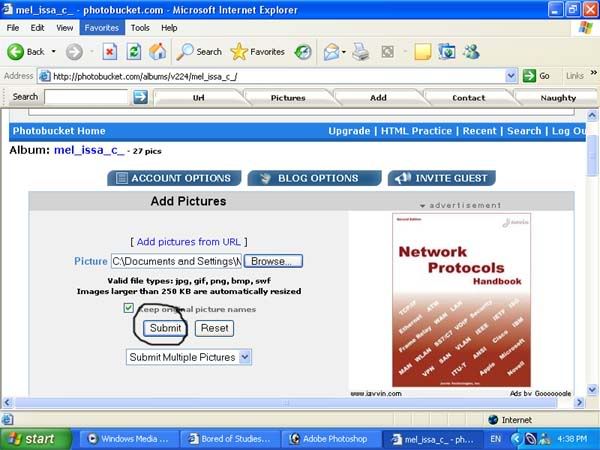
Then click submit, WAIT for it to upload...this may take a while
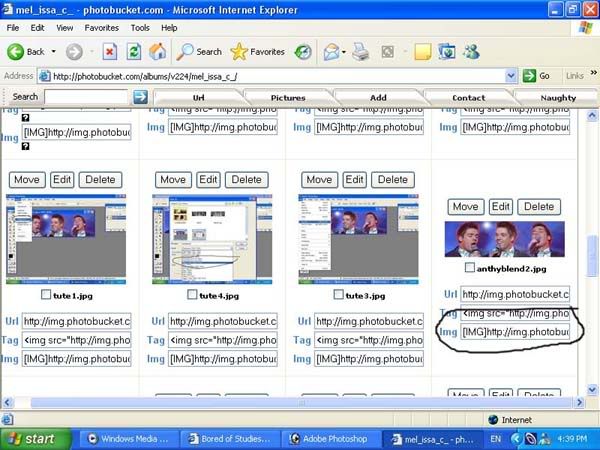
Once it has uploaded copy the image tag...using ctrlc, i've shown you in this picture.
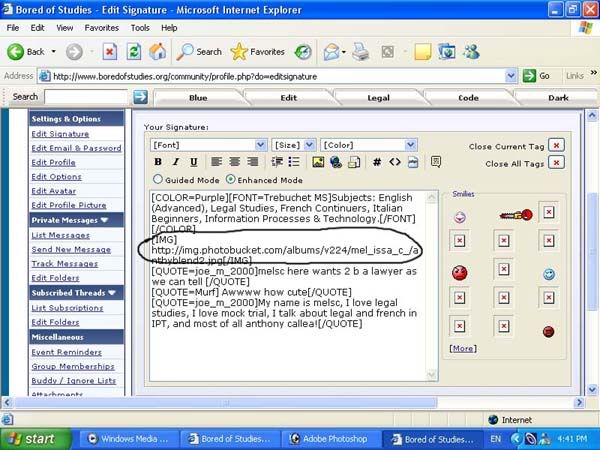
Now go back to bored of studies, then go to your user CP, go to edit signature. Then paste the IMG take you copied somewhere in the singature box. Make sure you click "save signature". Then you are done
Resizing Images
Making a 'blend'
Putting a picture in your signature
Resizing Images
This is how you re-size images, I used Photoshop 7 but you can use any graphics program.
So you have an image or blend and you want to resize it, this is how you do it.
Open your image then go to "Image" followed by "Image Size"

This should then pop up - you can make the dimensions you want, but the standard size for a blend like mine is usually 150*500 pixels.

Now you need to save the picture in a valid format, the most common format used on the net is JPEG. If you don't do this it will as a default save it as a PSD which is not always accepted by some hosting sites.

Be careful when saving to make sure that you save it as JPEG (or another format that is accepted by your hosting site) not PSD.

Making a "blend"
What is a blend you ask? This here is my poor excuse for a blend, I am going to
teach you how to make one.

I have used Paintshop Pro 8 but you can do this in most graphics programs.
First you need to go to file, new to start a new document. To make a blend the size of mine you need to change the size. Change the width to 500 pixels and the height to 150 pixels (check the setting next to it is on pixels) then click ok.

Now you need to open the pictures you intend to blend. You may have to change the folder, to open more than one image at a time - hold down ctrl as you click them. Then click open.

Once you have done this you will need to re-size you images so they fit in the blend, resize each one to the same height as your blend e.g. 150 pixels, the width will automatically resize as you do this YOU DO NOT NEED TO SAVE THE IMAGES. Go to image, resize.

Then change the dimensions to match your blend (e.g height 150 pixels) then click ok.

Repeat this for each picture. You need to click on the pciture to ensure the program knows which picture you are re-sizing.
Now you need to copy the picture. Right click the picture you are copying, then click copy.

Now right click on the new image you created at the beginning and click paste as a new layer.

Now you need to position the image, click the "move tool" and move the image to where ever you want it.

Copy, paste and move the other images in the same way. IT IS OK IF THEY OVERLAP AND COVER THINGS, THIS IS PART OF BLENDING.
So far it should look like this. Notice the overlaps, we will get rid of them in a sec.

Make sure your layers palette is showing, if it isn't right click the toolbar, click palettes, then click layers (you will need this later).
Next you need to click on the eraser tool.

Make sure that your eraser settings are the same as mine, as you get used to blending you can change them to what suits you.

Now move the eraser over the the overlapping area between the 1st and middle picture. Notice how the overlap is starting to fade away, continue to do this until the overlap has dissapeared. Also notice the layers palette, if nothing happens when you click the eraser tool or after one click the picture becomes see-through, click a different layer in the layers palette.

Repeat this for the area between the middle and 3rd picture (you will need to click a different layer, in my case it was layer/raster 5)
Now go to layers, merge and merge visable.

The end product should look like this.

Once you have done all of this, you can add text or effects. Then ensure you save it as a valid format and upload it to hosting site. Instructions for uploading to a hosting site, how to save and put the image in you signature can be found below.
Putting a picture in your signature
Before you do this you should make sure that your image is the right size and has been saved in a valid format.
You need to save the picture in a valid format, the most common format used on the net is JPEG. If you don't do this it will as a default save it as a PSD which is not always accepted.

Be careful when saving to make sure that you save it as JPEG (or another format that is accepted by your hosting site) not PSD.

Now you need to go to a hosting site such as
www.photobucket.com. Once you have registered you can upload images.
Firstly you have to log in, once you are done you go to "my album". Now you are ready to start uploading. Click browse to find the picture you want to upload.

Now find the file you want to upload, you may have to change the folder you are looking in. Then conce you find the picture click on it and click open.

Then click submit, WAIT for it to upload...this may take a while

Once it has uploaded copy the image tag...using ctrlc, i've shown you in this picture.

Now go back to bored of studies, then go to your user CP, go to edit signature. Then paste the IMG take you copied somewhere in the singature box. Make sure you click "save signature". Then you are done

Last edited:
